MikeK Posted May 24, 2022 Posted May 24, 2022 Unless they are loose they don't need epoxy adhesive. I leave mine alone but they look good coated. Mick posted a picture earlier in this thread showing a foregrip that has a coated winding check. Going back to the title, remember everything you've done added weight and "lightest" can be quantified with a scale.? Quote
SkinnyWaterBasser Posted May 24, 2022 Author Posted May 24, 2022 Gotcha, my thoughts were if I coat it, it would make it look almost seamless because the seat is glossy black too. Hoping to get this first build done this coming weekend. I've got a fishing trip coming up that I'm hoping to have it for. I'm really excited about this point blank. The more it's in my hand the more I like it. Quote
Super User casts_by_fly Posted May 24, 2022 Super User Posted May 24, 2022 13 minutes ago, SkinnyWaterBasser said: Gotcha, my thoughts were if I coat it, it would make it look almost seamless because the seat is glossy black too. Hoping to get this first build done this coming weekend. I've got a fishing trip coming up that I'm hoping to have it for. I'm really excited about this point blank. The more it's in my hand the more I like it. I would give it a week before you fish it. The epoxy will dry hard in 24-48 hours but it takes up to a week to fully cure. I've marked up guide wraps by fishing them too soon. Quote
SkinnyWaterBasser Posted May 24, 2022 Author Posted May 24, 2022 10 hours ago, casts_by_fly said: I would give it a week before you fish it. The epoxy will dry hard in 24-48 hours but it takes up to a week to fully cure. I've marked up guide wraps by fishing them too soon. Oooof thats no bueno. Looks like I'll be taking it the next trip. I'm not going to risk all the time and money I've invested to rush it and wreck the finish. Thanks a million for that one. Ida been sick with myself. Quote
Super User MickD Posted May 25, 2022 Super User Posted May 25, 2022 As I've stated before, my preference for looks and confidence in the durability is to totally encapsulate the soft black checks. My experience has been that sooner or later anything rubber or plastic will deteriorate with time/light/ozone/whatever, and to prevent that I totally encapsulate. I like the looks better than a flat black rubber piece, too. I epoxy them by placing epoxy onto the blank and cork/seat surface and slide them into position, then clean up. I don't think anyone has a scale that can reliably measure the difference in weight between an encapsulated check or two and an unfinished one. Quote
SkinnyWaterBasser Posted May 26, 2022 Author Posted May 26, 2022 On 5/24/2022 at 8:34 AM, casts_by_fly said: Can someone direct me to anyone who will do custom cork work for me? I don't have the means to turn my own. Quote
Super User MickD Posted May 26, 2022 Super User Posted May 26, 2022 38 minutes ago, SkinnyWaterBasser said: Can someone direct me to anyone who will do custom cork work for me? I don't have the means to turn my own. Do you have a drill press, or are you willing to get one? With a drill press and a cheap, simple, setup, you can turn cork and EVA very nicely. If you want details, message me with your email address and I'll get the info to you. I have too many irons in the fire to consider doing cork work for others. 1 Quote
Super User casts_by_fly Posted May 26, 2022 Super User Posted May 26, 2022 @S Hovanec maybe? You don’t need a large to turn one of you have a cork clamp and an electric sander. I did a bunch that way. Rough file to take the heavy off, then 240 grit on the sander. Flip it upside down between your knees. Hold the rod with both hands and turn it with just light pressure. Get the shape right and the work your way down 300/400 grit. 1 Quote
Super User S Hovanec Posted May 26, 2022 Super User Posted May 26, 2022 3 hours ago, casts_by_fly said: @S Hovanec maybe? I've made some grips and extensions for board members before. What are you looking for? 1 Quote
SkinnyWaterBasser Posted May 28, 2022 Author Posted May 28, 2022 Thanks guys for the suggestions and for the few folks who did offer to do the work. right now I'm working with the first person who offered to help. If by chance things weren't to work out I will definitely reach out to the others! But thanks again!! Quote
SkinnyWaterBasser Posted May 28, 2022 Author Posted May 28, 2022 Here's the blank I initially wanted to work with first but I'm waiting on some things because I ordered a wrong size. The seat and arbors are dry fit, the fighting butt is glued up. This has been a lot of fun so far, I've really enjoyed being able to get EXACTLY what I want. 1 Quote
Super User MickD Posted May 29, 2022 Super User Posted May 29, 2022 Before you glue the seat on make sure you like the placement of it vs a rod you like. You don't want the butt knob to get hung up in your elbow when going from low to high and vice versa. Try it with typical fishing clothes on. Looking good. That seat/front ramp arrangement will fish great! 1 Quote
SkinnyWaterBasser Posted May 29, 2022 Author Posted May 29, 2022 The angle makes the grip look longer than it really is. I shortened the grip length by close to 1¹/² compared to my current go-to spinning rod ( the grip length on that one is a whopping 12¹/⁴ inches and had the habit of catching the inside of my elbow on a regular basis. Drove me nuts. At 10¹/² inches it still allows for me to use the fighting butt against my forearm comfortably while fighting fish AND keeps it clear of the inner elbow for working baits and casting. I played with grip lengths from 8"-12" and found 10¹/² to be the overall best (for me) for balance and comfort. At least for my long arms. Moving the reel seat down also gives me as much useable rod on a 7 footer as I have on my 7'2" rod with the monster grip. 1 Quote
SkinnyWaterBasser Posted May 29, 2022 Author Posted May 29, 2022 Well the guides are all on except the tip top. 3.51 oz for the point blank 701mlf, 20h, 10h, 5.5m, 2 kb4.5s, 4 kt4.5s all titanium torzite, American tackle CCT apex seat ran without insert, and American tackle cork grip, hood cover, and fighting butt. The only thing she's missing is the 4.5/4.5 kg torzite tip top and the finish. I think you hit the nail right on the head Mick when you said it'll go 3.5-3.6 finished. Looking pretty good too. 1 Quote
Super User MickD Posted May 29, 2022 Super User Posted May 29, 2022 Let us know how you like fishing it. (I already know the answer, having one almost like this one.) Quote
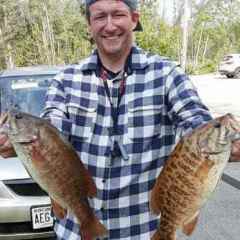
SkinnyWaterBasser Posted May 30, 2022 Author Posted May 30, 2022 Just thought I'd share a couple really nice catches today. 1 in particular SHe's not flat on the box so it's hard to see how long she was but you can definitely see the girth. 1 Quote
SkinnyWaterBasser Posted May 30, 2022 Author Posted May 30, 2022 Ordered a dryer. While I'm waiting im wondering how far above and below the guides/ wraps I should finish? Maybe a detailed picture or two of reduction guides and micros so I have references? Quote
Super User casts_by_fly Posted May 30, 2022 Super User Posted May 30, 2022 1 hour ago, SkinnyWaterBasser said: Ordered a dryer. While I'm waiting im wondering how far above and below the guides/ wraps I should finish? Maybe a detailed picture or two of reduction guides and micros so I have references? I do about the distance of 3-5 thread wraps. You need just enough to be sure the thread is coated. Any more is aesthetics and preference. 1 1 Quote
Super User MickD Posted May 31, 2022 Super User Posted May 31, 2022 Similarly, threads wraps need only be a few wraps past the foot of the guide. This is especially important out on the blank, not as big a deal near the butt. Quote
SkinnyWaterBasser Posted June 3, 2022 Author Posted June 3, 2022 On 5/31/2022 at 5:45 AM, MickD said: Similarly, threads wraps need only be a few wraps past the foot of the guide. As soon as the thread was locked I was already starting to pack against the feet. Some might have 1-2 more turns but the naked eye can barely register such difference. Really happy with how it looks, I settled a test wrap with alcohol and it really turned the thread a deep garnet color which is probably a lot like what finish will do to it. Not an EXACT match of the vanford red but in the sun it sure is close. Really excited to get the dryer and do some practice! Quote
RipHair Posted June 4, 2022 Posted June 4, 2022 Enjoyed reading this thread so far as I'm in the same camp of trying to build an extremely light rod. I'm building my 3rd rod which is a casting SB841-3. I used 4mm AC gray alconite guides, RV reverse stripper, thread size A. I should have measured everything from the get-go but a few measurements showed the 9-10 KB/KT guides to be less than 1g, or at least I need a better scale to measure micrograms. After wrapping the KTs on top section the weight of it plus the already installed tip top, its metallic wrap and epoxy it weighted 7-8g (sometimes 7 sometimes 8). I just finished the epoxy using Flex Coat Lite and what I did this time was heat it up with a BIC to get it more viscous and apply it as thinly as possible to all the guides. I then used the BIC again once on and wiped as much off as possible with a dry brush. Then I repeated one more time with the BIC and getting as much excess flex coat off. I then used a brush with 70% rubbing alcohol to clean up the epoxy that hit the blank. I measured the tip top again and it registered 8g, so I guess I must have put <1g of epoxy on just that top section and will weigh even less once dry. I plan on putting a second coat on though and will re-measure and update the thread tomorrow. Oh another thing is that I only wrapped the blank 2-3 times before ramping up the guide feet this time. I also did 3 locking wraps on all of my KT and KBs without any blocking wraps (thanks to @MickD again for the advice yesterday!) 1 Quote
Super User MickD Posted June 23, 2022 Super User Posted June 23, 2022 On 6/4/2022 at 3:23 PM, RipHair said: Flex Coat Lite and what I did this time was heat it up with a BIC to get it more viscous Heating will decrease the viscosity of epoxy. Quote
Super User MickD Posted June 23, 2022 Super User Posted June 23, 2022 On 6/4/2022 at 3:23 PM, RipHair said: I just finished the epoxy using Flex Coat Lite and what I did this time was heat it up with a BIC to get it more viscous and apply it as thinly as possible to all the guides. I then used the BIC again once on and wiped as much off as possible with a dry brush. Then I repeated one more time with the BIC and getting as much excess flex coat off. I then used a brush with 70% rubbing alcohol to clean up the epoxy that hit the blank. I measured the tip top again and it registered 8g, so I guess I must have put <1g of epoxy on just that top section and will weigh even less once dry. I plan on putting a second coat on though and will re-measure and update the thread tomorrow. With respect for what you are trying to accomplish, I think you are wasting time and at the same time possibly introducing problems. A thin coat of epoxy on guides that small weighs almost nothing, so all the attempts to make them lighter won't accomplish much if anything. Heating epoxy, especially multiple times, is asking for trouble. Wiping with anything is also risking problems. It's not necessary. Epoxy doesn't dry, it reacts. The two components react in a chemical reaction, so all you are doing with the alcohol on wet epoxy is possibly screwing up the chemical reaction. Then a second coat? Simply put on a single light coat of epoxy and let it be. Or a single coat (or more) of Permagloss, then let it be. Quote


Recommended Posts
Join the conversation
You can post now and register later. If you have an account, sign in now to post with your account.