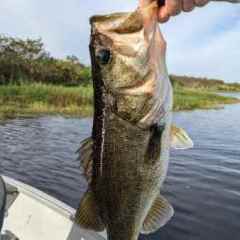
RipHair Posted February 13, 2022 Posted February 13, 2022 Thanks to everyone's help here I completed my first rod and I'm pretty happy with the result! It took a little bit longer than expected since I seemed to have lost components along the way and had to reorder a couple of extra times. The rod is built on a Rainshadow SB843-3 and will be used for my general fishing: crankbaits, spinnerbaits, texas rig, musky killers, etc.. The idea was to make it as barebones and light as possible so I used a size 17 SK2 split seat, Fuji RV size 6 Ti SiC followed by 3 size 5 alconite Fuji KBs then 7 size 5 alconite Fuji KTs lastly Fuji LG size 5 alconite tip-top. I used size A chestnut brown thread that I think turned out real nice... Basically looks almost black but in the sunlight it has a nice deep brown look sorta like fine mahogany ?. Some observations and things I learned along the way: I cheaped out and got a size LG reamer so had to use my drill to get up to 1/2" and I found that I didn't drill straight but thankfully could fix this as I reamed it out all the way. I since spent another $6 on a MD reamer but I think I'll still need to use a drill. I dunno about the reel seat position, some people said the handle is too short but I put it there after some testing based on if I thought it would get caught in my shirt. I will prob make my next rods' reel seat 1-2" higher towards the tip and maybe I'll get a better idea when actually fishing. I had a lot of fun with static load testing. I couldn't load test properly keeping the guides with masking tape on - they kept moving so I tied the tiptop to a chair so it was at 90deg bend then used braces elastics to hold the guides and didn't have to put a lot of pressure. I ended up going from 2 KBs + 5 KTs to 3 KBs and 7 KTs in the end. I think I got it at 60deg so the line didn't touch but I don't remember. Wrapping isn't easy. I had a few of them come loose just before I was going to epoxy them. I think I finally figured out how to secure the ends now so should be less of an issue. Hook keeper is facing up - I think this will be OK for a casting setup. I thought I had a good idea to duct tape my DeWalt drill at low speed to turn the rod for drying but it seems the stupid drill has some sort of safety shutoff after a couple of minutes. I couldn't figure out how to disable it. I got lazy the first epoxy drying and ended up with lopsided blobs. I filed them down and the 2nd coat seemed to make it more smooth. I still have some sharp things in my epoxy, not sure if they're thread ends sticking out or bubbles but should I use a razor blade to even them? I don't really want to apply any more epoxy - already got 2 coats of the Flex Coat low build. I think I'm addicted to building rods now. Rod came in at 3.5oz (100g) in the end. Was interesting to see that it was 99g before my 2nd epoxy coat. My next build is gonna be the SB841-3 that @MickD originally recommended. This will be for lighter detail like weightless wormin' but if it can cast some 3/4oz musky killers then this power rod (rated at M power I think) will be my general purpose rod and I'll be building yet a lighter rod for the finessing stuff. It will be a bait caster setup as well but this time with size 16 so I can compare. Will be using gold thread for this and the next one. The blank I'll be building with the SB841-3 is a AT841-3 Mag Bass Travel Rod Blank that feels way more whippy than the SB841-3. I'll be building this as a spinning rod so maybe this will end up being my favorite for finesse weightless worming. I also have my eyes on an SCV 2pc - it'll be a bit longer and harder to travel with but I'm really curious to see how that fishes. Also, before spending the money I want to get a better feel for the power profiles of these 3 rods so I can dial in exactly what SCV I want. 2 Quote
Chris Catignani Posted February 13, 2022 Posted February 13, 2022 #2 - The handle looks pretty good to me #4 - You may just need a little more pressure and or a few more wraps over the pull loop. #5 - I do this on all the rods...the hook keeper is positioned about 45 degrees left of bottom. If you turn you wrist just a bit ...the hook keeper is sticking out exposed (left). #6 - apply a thin coat...it should not blob. #7 - I will use the side of a flame from a BiC lighter to singe the ends down...then I will just pick off tiny bead with my finger nail. All in all...it looks fine. 1 Quote
Super User MickD Posted February 13, 2022 Super User Posted February 13, 2022 3 hours ago, RipHair said: I had a lot of fun with static load testing. I couldn't load test properly keeping the guides with masking tape on - they kept moving so I tied the tiptop to a chair so it was at 90deg bend then used braces elastics to hold the guides and didn't have to put a lot of pressure. I ended up going from 2 KBs + 5 KTs to 3 KBs and 7 KTs in the end. I think I got it at 60deg so the line didn't touch but I don't remember. Use the two line method at anglersresource.net and the guides don't load the rod so they stay on easier and they don't move on you. 3 hours ago, RipHair said: Wrapping isn't easy. I had a few of them come loose just before I was going to epoxy them. I think I finally figured out how to secure the ends now so should be less of an issue. Sounds like you need to go up on thread tension a little. You should be able to move them after wrapping/before finishing, but it should take a bit of force, and they shouldn't be on the verge of unravelling or moving easily 3 hours ago, RipHair said: I still have some sharp things in my epoxy, not sure if they're thread ends sticking out or bubbles but should I use a razor blade to even them? I don't really want to apply any more epoxy - already got 2 coats of the Flex Coat low build. Yes, you can cut off thread nibs with a sharp razor/craft knife,then just a thin coat over them. You'll never see the evidence. 3 hours ago, RipHair said: this time with size 16 I've never built a size 17 cast. When I recommended a 17 I was assuming spin. Bad assumption. I think overall the build came out very well. If the keeper is a problem with catching line just take it off and put it at 180 degrees. With it on the bottom any line that falls against the rod will not get caught on it. I have tried them on spin at 270 degrees and on both rods the fishermen have commented on occasional line getting hung up on them. Nice job, welcome to the club. Quote
RipHair Posted February 13, 2022 Author Posted February 13, 2022 The thread unraveling was actually on the end I started with. I don't think I was properly wrapping over the thread end enough and when I was using the burnishing tool at the end of the wrap then the whole thing came undone. I will add some more tension next time I wrap, I'm using a wrap jig I rigged up using the modhole box and for pressure I'm wrapping the thread around an eyehook a few times. I may put masking tape there to add some resistance. For the size 17, it wasn't just your recommendation Mick, I was scanning the forum and a few people mentioned size 17. Anyway, I'll see how the size 16 turns out, it's really not that much bigger but I do like how the size 16 inside diameter is a bit closer to the blank diameter. @MickDonce again I'm having trouble locating a particular resource located on anglersresource.net. I searched articles and videos on the two line method but nothing came up. Sorry for my bad luck. One other thing with the guides, how in tarnation do you line them up straight? I tried running some line through them but even that isn't super precise. Only thing I can think of is a laser pointer, something I don't have. Quote
KCFinesse Posted February 13, 2022 Posted February 13, 2022 2 hours ago, RipHair said: The thread unraveling was actually on the end I started with. I don't think I was properly wrapping over the thread end enough and when I was using the burnishing tool at the end of the wrap then the whole thing came undone. I will add some more tension next time I wrap, I'm using a wrap jig I rigged up using the modhole box and for pressure I'm wrapping the thread around an eyehook a few times. I may put masking tape there to add some resistance. Don't be afraid to wrap over the starting tag- a lot of times I'll carry up the tag 1/4" or so. As for thread tension, stacking books on thread works- I use a regular ceramic tip bobbin with weights clipped on- there are a ton of ways to do it! 1 Quote
Super User MickD Posted February 13, 2022 Super User Posted February 13, 2022 2 hours ago, RipHair said: The thread unraveling was actually on the end I started with. I don't think I was properly wrapping over the thread end enough and when I was using the burnishing tool at the end of the wrap then the whole thing came undone. I will add some more tension next time I wrap, I'm using a wrap jig I rigged up using the modhole box and for pressure I'm wrapping the thread around an eyehook a few times. I may put masking tape there to add some resistance. For the size 17, it wasn't just your recommendation Mick, I was scanning the forum and a few people mentioned size 17. Anyway, I'll see how the size 16 turns out, it's really not that much bigger but I do like how the size 16 inside diameter is a bit closer to the blank diameter. @MickDonce again I'm having trouble locating a particular resource located on anglersresource.net. I searched articles and videos on the two line method but nothing came up. Sorry for my bad luck. One other thing with the guides, how in tarnation do you line them up straight? I tried running some line through them but even that isn't super precise. Only thing I can think of is a laser pointer, something I don't have. https://anglersresource.net/static-load-tutorial/ Don't worry about a tool to align the guides, just use your eyes. Point the rod towards a light source that gives a good view of the guides and keep tweaking them based on your observations of them until they look right. They will be right. 2 Quote
Chris Catignani Posted February 14, 2022 Posted February 14, 2022 1 hour ago, MickD said: ... keep tweaking them based on your observations of them until they look right. They will be right. yes...the guide foot will move...even after its wrapped on. Quote
spoonplugger1 Posted February 14, 2022 Posted February 14, 2022 Great looking stick, the travel peacock bass blanks Rainshadow used to make in the RX7 graphite were extraordinary travel rods also. One of many things Batson knows how to do so well. You did well. Quote
RipHair Posted February 14, 2022 Author Posted February 14, 2022 31 minutes ago, spoonplugger1 said: Great looking stick, the travel peacock bass blanks Rainshadow used to make in the RX7 graphite were extraordinary travel rods also. One of many things Batson knows how to do so well. You did well. Thanks. I assume they don't make them anymore? Too bad there aren't so many 3pc options available and it's why I'm considering stepping it up to the SCV 2pc to try to get a taste of something more premium. At least with this rod I can tell it's much superior to my St Croix Triumph 4pc travel rod. One other question for the group: I don't think there was a serial number that came with the blank, just a sticker. I don't plan on sticking it on the blank either. Is this an issue with warranty? Also, I read up a bit on the warranty and you basically need to send them the broken piece with $20 for them to inspect it and only if they determine it's their fault do they replace it that broken piece? I assume if that's the case then one would probably be better off just ordering a whole new blank so they have 3 backup pieces? Quote
RipHair Posted July 18, 2022 Author Posted July 18, 2022 This rod is working pretty well with pretty much everything I'm throwing at it. I haven't tried a weightless wacky 5" senko yet, if it can handle that then this will probably be my main workhorse. The heaviest I tried throwing was a magbass swimbait with a 6/0 weighted jungle hook. It causes the rod to pretty much load to max but I still throw it out there. I may need to build something slightly more heavy for these heavier applications. Quote


Recommended Posts
Join the conversation
You can post now and register later. If you have an account, sign in now to post with your account.