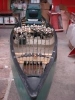
Super User Fishing Rhino Posted December 3, 2016 Super User Posted December 3, 2016 My neighbor across the street acquired a 13 foot Boston Whaler that needed a lot of love. We have a good relationship. When Marcia and I go to Daytona for the races, then stop to visit our daughter on the way home he keeps our driveway plowed so our daughter can get to work. He won't take anything for it. I agreed to work on his boat. The only thing he paid for was materials and labor for the fellow who works with me. I should have taken photos before we started working on the boat, but you can see the areas we repaired. This boat apparently spent a lot of time on the rocks. It was beat up pretty badly. The gray areas are bondo used over the fiberglass to easily smooth the surface. It takes a lot of work to sand down the texture of the fiberglass mat. The bottom edge of the transom was gnawed away. The vertical brownish smear on the side was a crack in the hull. Now all he has to do is sand and paint the inside and the rail caps. Cost him just under eight hundred dollars. 3 Quote
Super User Goose52 Posted December 3, 2016 Super User Posted December 3, 2016 WOW - the outside of the hull looks GREAT Quote
VolFan Posted December 3, 2016 Posted December 3, 2016 It really does look better than new. Did you add anything to the bottom edge of the transom for reinforcement? And what did you paint it with? Quote
Super User Fishing Rhino Posted December 3, 2016 Author Super User Posted December 3, 2016 1 hour ago, VolFan said: It really does look better than new. Did you add anything to the bottom edge of the transom for reinforcement? And what did you paint it with? Four layers of fiberglass 3/4 ounce mat composition at the stern/bottom area. Starting with a two inch wide strip of mat with torn, not cut edges. Then, a three, four and five torn edge widths of mat/resin composition. The torn edge gives you a feathered edge rather than a series of steps which will have to be sanded. You do a lot less sanding when you tear rather than cut the edges. each layer overlapped the edges of the prior level. We ran the composite a little wider on the stern than on the bottom because that's where most of the damage wa. White gel coat below the waterline. Above the waterline is Interlux Brightside, polyurethane paint. Quote
Super User Redlinerobert Posted December 4, 2016 Super User Posted December 4, 2016 Rhino, you're hired for my future classic Ranger restoration. 1 Quote
Robeng Posted December 7, 2016 Posted December 7, 2016 Nice. Real nice job. Thanks for sharing. Quote
Super User J Francho Posted December 7, 2016 Super User Posted December 7, 2016 Looks great. Those are really cool little boats. Quote
crazyjoeclemens Posted December 8, 2016 Posted December 8, 2016 On 12/4/2016 at 0:33 AM, Redlinerobert said: Rhino, you're hired for my future classic Ranger restoration. x2 That looks like some outstanding work. Quote


Recommended Posts
Join the conversation
You can post now and register later. If you have an account, sign in now to post with your account.