Great questions!!
Loading/Unloading - it really is that simple. The key is to understand the laws and principles of fulcrums and leverage. Think of it as an overgrown see-saw where you are leveraging the assistance of the vehicle as a means to reduce the actual lifting weight you encounter while loading and unloading.
Securing the hull - the one part I left out of the video on purpose was the process of securing the PA to my rack system. IT is fairly mundane to watch me tossing straps across the hull and securing it, but I do not go anywher without it secured that is for certain. Since I was only going right down the street from my house for this video, I just used the dual strap approach. For all other trips, I use a combination of 4 securing points. Two straps are twisted (to avoid wind hum on the road during travel) under one side of the vehicle's crossbars and laid across to the other side and secured. A third securing strap is attached to the bow handle and run to front end of the vehicle, and the fourth strap is simply some nylon cord that is run from the stern handle to a fixed bracket on the undercarriage of my van. This method provides the security of limiting the chances of your hull sliding off your vehicle. I also take it one step further on trips where I will be leaving the PA on my vehicle for an extended amount of time. I have two 15' coated/twisted metal lanyards that I run through the various openings on the PA and around the rack system then locked into place with a Master Lock. Just in case someone tries top steal it, but more so in case of an accident where the momentum of a crash may exceed the holding strentgth of the nylon webbing of the straps.
Crate system - is actually your standard 13" x 13" milk crate. I have a PrecisionPak CratePak sleeve that slides over it and has integrated accessory pouches and a 3-rod holder on the back. The sleeve is a little difficult to find, due to PP going out of business. But they can still be found online if you look hard enough. It's more of a luxury to be honest. You can take a standard milk crate and attach the 3-rod Berkley or Attwood rod holders found at Walmart and secure them with s/s bolts and lock nuts or just use zip ties. There are several other pre-fabbed alternatives aroundas well (NRS, YakAttack BlackPak and WhitePak, Plano Marine Dry Boxes, all purpose tackle bags, coolers with rod holders attached, even backpacks can be used - lots of options).
Rod access - accessing rods stored behind you can be accomplished a number of ways. The easiest is simply to turn your torso left or right and grab the one you want. Another method is the "quiver" approach where you simply reach directly behind and over your head to pull a rod out like an arrow from a quiver. The integrated rod holders on the Pro Angler (and many other kayak brands as well) are easier to access, since they require little to no torso turn to access. Once you build up your comfort level in any kayak, you will be grabbing and stowing your combos with ease and confidence.
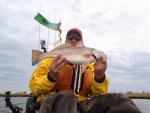
Landing large fish - the largest I have landed out of a kayak is a 40" black drum down in Rudee Inlet a few years ago. I've landed several mid to high 20's stripers with ease. It's really a non factor when you think about it. The key is leveraging the hull resistance of the kayak by fighting the fish on your port (left) or starboard (right) side of the kayak. The combination of the water, the kayak's hull, leverage of the rod and the reel's drag will tire out larger fish pretty quickly. Plus, you're also at water level making the hoisting of larger fish into your footwell area much easier.
Rough seas - I've been in a variety of nasty water conditions before in my Hobie Revolution 13, and just a couple weeks ago in the PA14. In the Revolution 13 on a July 4th weekend, I got caught on the water in a nasty sudden storm with three other of my kayak friends. The storm was so intense that our rods were humming from the electrical fields generated from the storm while we were riding 6-8' swells underneath the Hampton Roads Bridge Tunnel. The waves were cresting so high that we could touch the underside of the bridge as we maintained our position out of the wind and rain. The other week, I was hammered by 20-25 mph winds and cresting 1' white caps on the lake I was at. I just plowed right through them. The thing to remember about the PA and other Sit On Top (SOT) style kayaks is that they have opening called scupper holes to allow any water in the cockpit and tankwell area to egress the hull with ease. They are designed to handle these situations with easy, but you have to understand your limitations both from a skill perspective and your general safety. When in doubt, stay close to shore or better yet, pick another area or stay home. It's better to be safe than sorry.
Wind impact - as with any vessel on the water, wind is going to be a factor at some point. The key to managing the impact wind has on you is to remember to position your bow into the wind whenever possible. Sometimes it's just a battle to be honest. The video I produced for this thress did not have over 2 hours of my footage due to wind noise and shaking the camera mount on the water. Situational awareness is the key to minimizing the effect wind has on your positioning. Just ask JFrancho or Dwight about keeping a "weather eye on the horizon" and situational awareness while out on big waters like Eerie. The other things you can do is to minimize your overall profile footprint when on the water. This means avoiding large flat surfaced items in the kayak. Unfortunately, the seat, your body, the paddle laying across your lap and the PFD are all items that you would have on the water for any given trip, yet these are the items that will increase the chances of you getting pushed around out of position. For very windy days, I carry three accessories to combat this situation. An anchor for deeper waters, a stake out pole for the shallow flat areas, and a homemade brush clip with a length of line for attaching to a tree limb.
Rudder & Steering - all of the Mirage Drive kayaks in the Hobie lineup have integrated rudders. The Pro Anglers is however different than the others in that it is a keel mounted rudder that stows in a rear channel underneath of the PA to avoid damage when not in use. Deploying or stowing the rudder is very simple. There is a cam cleat on the starboard side that has a T-handled cable labeled as RUDDER. To delpoy the rudder, you simple remove the RUDDER cable with a slight pull and lift up to release the rudder down. Upon returning to shore or long stretches of shallow water, you simply pull on the handle again until you feel the rudder stow, then simply lay the cable in the cam cleat and this time the cable will lock itelf in place. As far as steering, the Pro Angler comes standard with the rudder and the rudder handle mounted on the side rail. I went ahead and ordered a second handle and had it installed on the opposite handle that way I can steer with either hand depending upon what combos arebeing used. For my spinning reels, they are all elft hand retrieve, so I use the left rudder handle. All but one of mycasting reels is right handed, so I use the right hand rudder handle then.
Weight concerns - the PA12 has a 500lb hull capacity, while the PA14 has a 600lb hull capacity. So it can handle a significant load. I'm 6'2" and weigh 220lbs, and you can see how I have no issues at all. I have a couple friends that are larger than myself and they have no issues either.
I hope that answers your questions sufficiently. If not or if it sparks more questions, post them up here. I'll be glad to help anyway I can.